
If you have been used to earlier versions of the editor you will find the degree of control you have over the layout of the editor has increased significantly. In earlier versions of the editor tabs were fixed within a data entry panel and each panel was fixed in one of the three columns of the editor. It is now possible to position any panel within any of the 3 columns, place any tab within any panel and create new panels simply by dragging a dropping elements of the interface.
Before describing how to go about rearranging elements of the interface it is necessary to explain the concept of perspectives. There are three perspectives available in the interface: Taxonomic, Bulk editor and Polytomous Key. The changes you make to the layout of the editor will apply only to the currently active perspective. This will eventually allow you to create three independent arrangements of the editor which best suit your work flow within each perspective.
N.B. The Polytomous Key function is not available in this version of the Editor.
By default the taxonomic perspective is loaded however after first use of the editor the last used perspective will be displayed when the editor is restarted.
To open a perspective
After a new perspective has been opened the last perspective viewed will remain open but will be hidden and replaced by the new perspective. A new button will be added to the perspectives tab allowing you to quickly switch between perspectives.
After a new button has been added to the perspective tabs you may find that there is insufficient room to display all the buttons in which case the perspective tabs will display a double headed arrow on the right hand side as shown below.
To reveal the hidden buttons you can either click on the double headed arrow, the results of which are shown below

Or you can hover the mouse over the left hand edge of the tab until the cursor changes to a double headed arrow as shown below.

When the cursor changes in this way left click the mouse and drag the edge of the tab to the left to enlarge it. Release the mouse button when you are happy with the size of the tab. The following screen shot shows the editor with the perspective tab enlarge sufficiently to display all three open perspective buttons and with the taxonomic perspective currently active.

The screen shots below show the effect of changing between a taxonomic and bulk editing frame work.
Default Taxonomic Perspective
Bulk Editing Perspective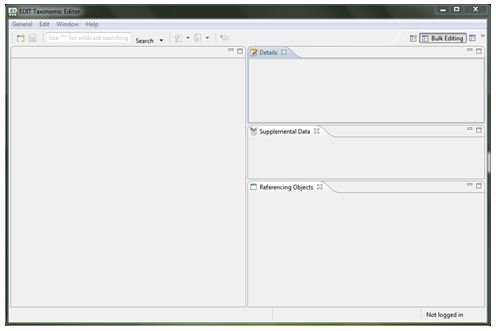
N.B. before moving a panel make sure that you have the correct perspective open.

Details panel is moved to to create a new alongside the Descriptive panel.
The file icon ( ) shows that the details panel will be stacked behind any panels which are located here already.

Details panel is moved to form a new column alongside the Taxon Name panel. NB this will now need to be resized to display the text.
The black arrow icon ( )shows that the details panel will form a new column rather than stacking behind the existing panels in the space.

Details panel is moved to form a new column alongside the Taxon Name

Panels can also be detached from the workspace. This can be done in two ways.
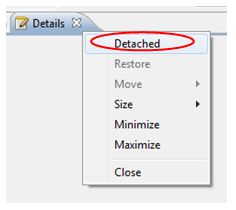
To reattach the panel again right click in heading tab and unselect detached tick box.
